I do wish I had a better camera, and that I was a much, much better photographer, but I hope you can get a good enough idea of this pin cushion from my images.
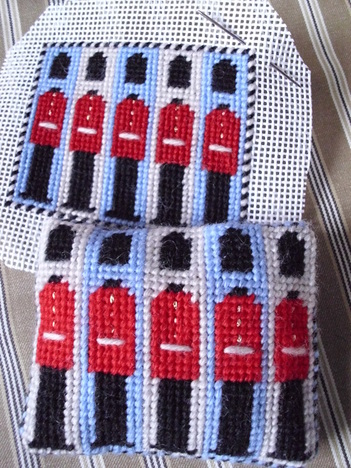
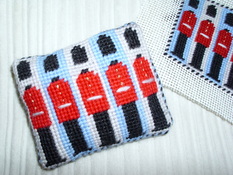
Standing to attention are a row of stylised guardsmen, resplendent in red tunics and (faux fur) bear skin hats. The striped background is reminiscent of the sentry box a guardsman might stand in.
Standing to attention are a row of stylised guardsmen, resplendent in red tunics and (faux fur) bear skin hats. The striped background is reminiscent of the sentry box a guardsman might stand in.
This simple to stitch pin cushion is an easy project for a needlepoint newbie, or a quick and easy make for a more experienced crafter. I used offcuts of canvas of differing gauges, but it doesn’t make a massive difference to the size of the finished cushion. (Reminder: what I mean by gauges is that some canvas has 12 holes per inch or some has 10 holes per inch. Sorry to all you Metric Marys out there, but it’s easier to explain in ‘old money’. Use whatever canvas you’ve got or can cadge off a crafty friend, but always allow a generous inch at least of bare canvas around your finished piece.) If you don’t know what gauge your canvas is, just get a ruler and put that against the material and count those holes! For this project, let’s assume you’re using 12 holes per inch canvas.
YOU'LL NEED:
A piece of canvas, approx. 6 inches by 6 inches.
A tapestry needle (big, blunt, with a large eye. Sounds like a guy I once dated ….)
A skein of Anchor tapestry wool in each of these colours:
sock-it-to-em scarlet
black
a pale blue
and an off white/pale grey.
I haven’t specified shade numbers as you can use up leftover wool in your stash or you can have fun picking out colours you want from your local craft shop.
A tiny amount of metallic thread for the tunic buttons. I use the deliciously named Goldfingering by Twilley's.
A piece of backing material, about the same size as your blank canvas.
Plus: a pair of scissors, dress making pins, some ‘stuffing’ and a reel of cotton thread.
I used grey felt to back this pin cushion simply because I had it to hand, but you could substitute a bit of vintage material or furnishing fabric. I didn’t have any matching grey thread, but a very pale blue did the job just as well. The cushion was stuffed with fabric remnants, but you could use a commercial toy stuffing or even uncooked grains of rice for a nice crunchy sounding filler. Whatever you use, pack the pin cushion tightly. No one wants a limp pin cushion.
INSTRUCTIONS:
The assembly of this pin cushion is pretty straightforward. Follow the chart (see link to PDF file further below), with each square on the pattern representing one stitch.
For the complete needlepoint newbie: if you don’t know how to stitch, get yourself online and watch a YouTube video or lurk in the library where you’ll find needlepoint books to refer to. Look out for authors like Mary Norden or Kaffe Fassett. I won’t go through the process of ‘how to stitch’ here, but those books will contain simple diagrams and explanations.
Once the basic design is stitched, the guardsman’s belt and gold buttons are sewn on top of your completed scarlet tunic. They're the most basic of running stitches, with larger ones to represent the belt and tiny stitches for the buttons. You could even do fancy French knots if you know how. Then just lay your piece face down on the backing fabric, pin it in place on 3 sides and sew up. Turn the pin cushion right side out, pushing out the corners as best you can,pack with filler and neatly sew up that 4th seam. Ta-dah!
I hope you enjoy this project, and any comments or feedback would be welcome.
| guardsmen_pin_cushion.pdf |

